Patient transfers at home using a seated patient transfer lift chair for safe, controlled movement

29

Jan

Patient Transfers at Home: The Safe Step-by-Step Guide + How to Choose the Best Patient Lift (Without Guessing)

Patient Transfers at Home • Safety Resource
Key Takeaway

The safest patient transfers at home don’t rely on strength — they rely on stability, alignment, and controlled movement. If a transfer requires rushing, twisting, or “trying again,” it’s time to change the method — and that’s often when choosing the best patient lift becomes a safety decision.

Why Transfers Feel Unsafe (Even When “Nothing Happens”)

Most people search for help long before they know what a patient lift transfer chair is. They’re trying to move someone bed ↔ chair or bed ↔ toilet without falls, fear, or caregiver injury. Below are the real-world reasons transfers break down — and the safety principles that make results consistent.

The 5 Moments Where Transfers Usually Fail

Stand-up phase: uneven footing, weak knees, sudden dizziness, or pulling on the caregiver’s arms.
Pivot phase: twisting + momentum is where falls and back injuries spike.
Seat-down phase: “dropping” into the chair/toilet creates loss of control and fear.
Bathroom pressure: urgency + tight space + fatigue makes bed-to-toilet one of the highest-risk routines.
Repeat transfers: if this happens multiple times daily, you need repeatable technique — not improvisation.

Safety threshold (simple rule): If the caregiver must brace with back/knees, if the patient collapses or “drops,” or if you need multiple attempts to stand — the transfer method needs upgrading. That’s where options like a seated patient transfer device or a lift chair for patient transfers may become appropriate.

Section 2 • Transfer Basics (Home Care)

What “Patient Transfers at Home” Actually Means (And Why Most People Struggle)

A “patient transfer” is any assisted move from one surface to another — like bed ↔ chair, chair ↔ toilet, or chair ↔ car seat. In real homes, transfers feel difficult because they combine tight spaces, fatigue, fear, and timing pressure. The goal is not to “lift” someone — it’s to guide a stable, controlled repositioning. This foundation helps you decide when technique is enough and when choosing the best patient lift becomes the safer step.

The 4 Most Common Transfers at Home (And What Makes Each Risky)

Bed ↔ chair/wheelchair: height mismatch + soft mattress edges create instability during stand and seat-down.
Bed/chair ↔ toilet: urgency + tight bathrooms + slippery flooring increases rushing and twisting.
Chair ↔ car seat: low seat height + narrow door clearance makes alignment difficult without controlled vertical movement.
Chair ↔ chair (room-to-room routines): repeated daily moves create fatigue; technique breaks down over time.

The 60-Second Pre-Transfer Checklist (Use This Every Time)

Clear the path: remove rugs, cords, and clutter — especially near bathrooms.
Lock wheels: wheelchair/commode brakes on, stable chair surface, bed height set if adjustable.
Match heights: large height gaps create “drop” risk during the seat-down phase.
Plan the pivot: avoid twisting — move feet, not the spine. Keep the destination chair close.
Cue the patient: “nose over toes,” slow count, and one clear direction at a time reduces sudden movements.

If you’re doing this checklist perfectly and transfers are still unsafe, it’s usually not “bad effort” — it’s a sign the situation needs a safer method, sometimes including a seated patient transfer device or another form of the best patient lift for the home.

Section 3 • Patient Transfer Help & Resources

Patient Transfer Help at Home: From Simple Support to the Right Lift Solution

When people search for help with patient transfers at home, they’re rarely asking for a product. They’re asking: “What can I do to make this safer?” This visual guide walks through transfer support options — from simplest to most supportive — so you can recognize when technique is enough and when choosing the best patient lift becomes the safer next step.

LEVEL 1

Technique & Environment Support (Lowest Risk Situations)

These methods rely on the patient being mostly stable and able to follow cues. They are appropriate when transfers are infrequent and do not involve collapse or panic.

Verbal cueing: slow counting, “nose over toes,” one instruction at a time.
Environmental setup: chair height alignment, removing rugs, proper lighting.
Caregiver positioning: wide stance, neutral spine, moving feet instead of twisting.

Move up a level if: transfers require repeated attempts, physical bracing, or feel unpredictable.

LEVEL 2

Assistive Transfer Aids (Moderate Support)

These aids reduce strain but still rely on partial patient participation. They are often used as a bridge before mechanical assistance is required.

Gait belts: provide control but do not prevent collapse or twisting.
Transfer boards: useful for seated lateral moves (bed ↔ wheelchair).
Stand-assist devices: helpful when leg strength is inconsistent but present.

Limit: these aids do not control vertical movement or protect against sudden loss of balance.

LEVEL 3

Mechanical Transfer Assistance (Highest Safety Control)

When technique and aids are no longer enough, mechanical assistance provides controlled, repeatable movement — especially important for daily routines.

Seated patient transfer devices: keep the patient upright and supported throughout the move.
Lift chair for patient transfers: assists vertical alignment without full-body suspension.
Patient lift transfer chair: designed for repeat, daily transfers with one caregiver.

Key benefit: predictable, controlled motion — which is why these are often considered the best patient lift option for many home environments.

In the next section, we’ll focus specifically on patient lift transfer chairs — who they’re best for, who they’re not for, and how they compare to other lift types in real homes.

Section 4 • Patient Lift Transfer Chairs (Explained)

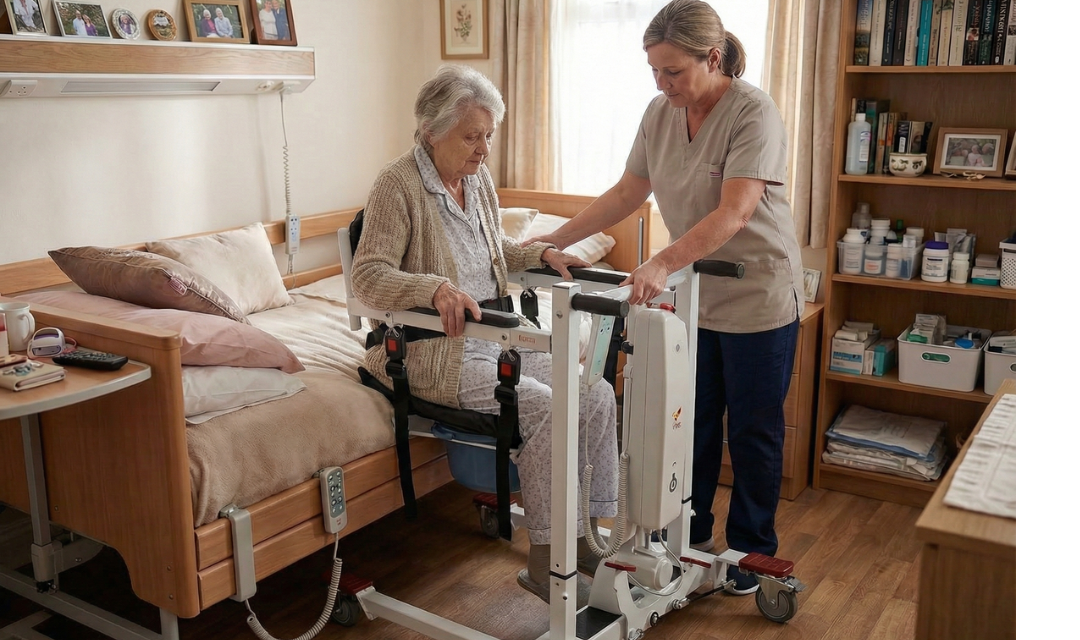
Patient Lift Transfer Chair: What It Is, Who It Helps Most, and When It’s the Best Patient Lift Choice

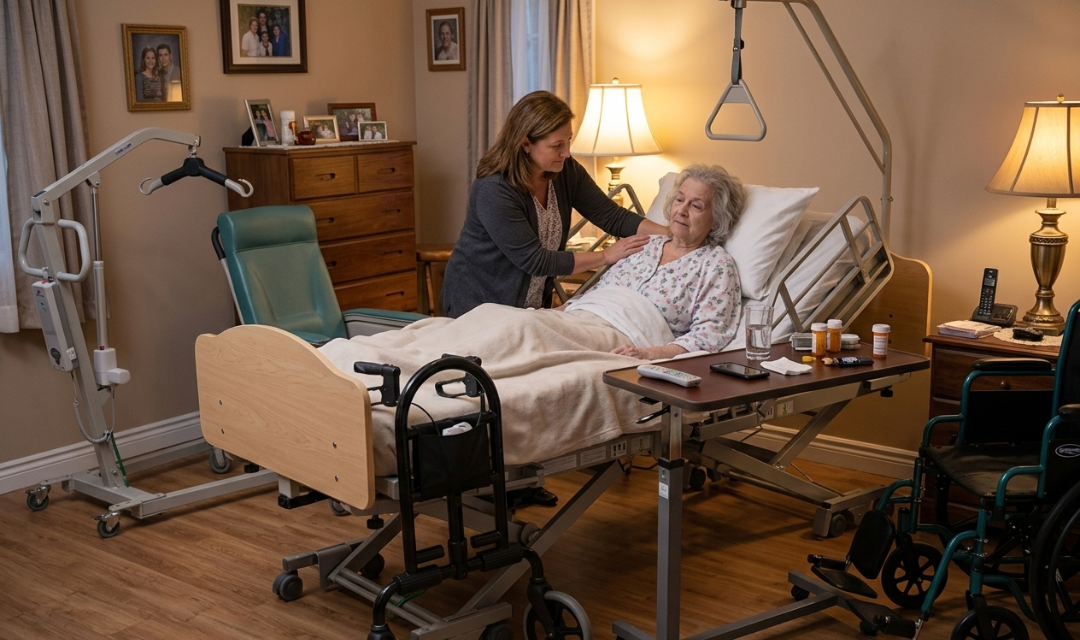
A patient lift transfer chair is designed to move a person between surfaces while they remain seated upright — not suspended in a sling. For many families managing patient transfers at home, this feels more natural, more dignified, and easier to repeat every day (especially for bed-to-toilet and chair-to-chair routines). The key is knowing when a seated approach is appropriate — and when another lift type is safer.

Visual explainer: Sling lift vs seated transfer lift chair
Quick Clarity

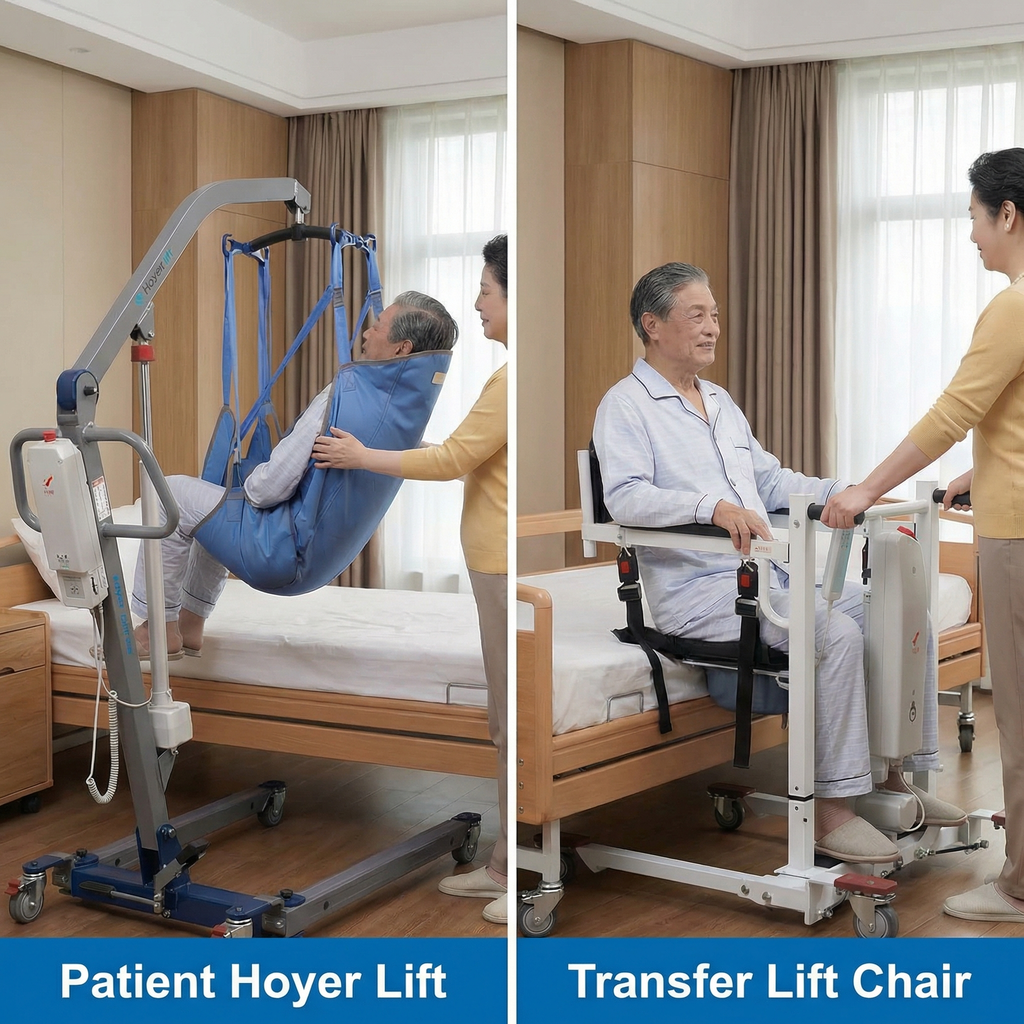
This one image answers the question most people don’t know how to ask yet: “Should we use a sling lift or a seated transfer method at home?”

Hoyer (sling) lifts: ideal for full-assist needs and limited sitting control.
Seated patient transfer devices: preferred when upright, controlled seated transfers are possible and repeated daily.

Bottom line: the “best patient lift” is the one that matches stability, environment, and repeat routines — not just what looks easiest.

Patient Hoyer lift compared to seated patient lift transfer chair for patient transfers at home

What a Seated Patient Transfer Device Actually Does

Keeps the patient seated upright for comfort, stability, and dignity.
Controls the most dangerous moments: stand-up, pivot, and seat-down.
Helps one caregiver transfer more safely by reducing lifting strain and “catching” risk.
Works well for routine transfers like bed ↔ chair, chair ↔ toilet, and room-to-room moves.

A “lift chair for patient transfers” isn’t just about convenience — it’s about making transfers repeatable, controlled, and safer when routines happen multiple times a day.

Who a Patient Lift Transfer Chair Helps Most

Seniors who can sit upright but struggle to stand safely or pivot without fear.
Home caregivers doing transfers solo who need fewer steps and less strain.
Frequent bathroom transfer routines where rushing and tight space increase risk.
Patients who dislike slings and feel safer staying seated during the move.

In many homes, this category becomes the best patient lift option when the priority is repeatable seated transfers rather than full-body suspension.

Next, we’ll get practical: fit checks that make or break success at home (doorways, toilet clearance, turning space), and how to choose between a seated transfer approach and other lift categories without guesswork.

Section 5 • Best Patient Lift (Decision + Comparison)

How to Choose the Best Patient Lift for Patient Transfers at Home (Without Guessing)

The phrase “best patient lift” is often misunderstood. It doesn’t mean “the strongest” or “the most expensive.” It means: the lift type that matches the patient’s stability, the home’s space constraints, and the caregiver’s ability to perform transfers consistently and safely. This section gives you a practical framework and a clear comparison so you can choose the right solution for patient transfers at home with confidence.

Core Rule

If transfers depend on strength, speed, or “trying again”, you need more control — and the right lift category should provide repeatable movement, not just “assistance.”

Step 1: Identify the “Transfer Category” (This Decides Everything)

1 Mostly independent: needs steadying + cues (low risk, technique-focused).
2 Partial assist: can sit upright but standing/pivoting is unreliable (control becomes priority).
3 Full assist: cannot safely sit/stand without full-body support (maximum stabilization needed).

The “best patient lift” is the one that matches the category above — not the one that looks easiest online.

Where Seated Transfer Lift Chairs Fit (And Why They’re Often “Best” for Homes)

For many patient transfers at home, the safest upgrades come from gaining control without making the process complicated. This is exactly why a seated patient transfer device can be the best choice for daily routines — the patient stays upright and supported while height and positioning become predictable.

Daily bathroom routines: reduces rushing + improves repeatability.
One-caregiver transfers: less strain, fewer “catch” moments.
Sling refusal or discomfort: seated transfers can feel more natural for many users.

If you want to explore examples of these categories, see the patient lift chair collection and two common home-use formats: patient lift transfer chair (seated, routine-friendly) and an EZ Lift Assist patient lift chair style (designed to simplify daily transfers with controlled lift support).

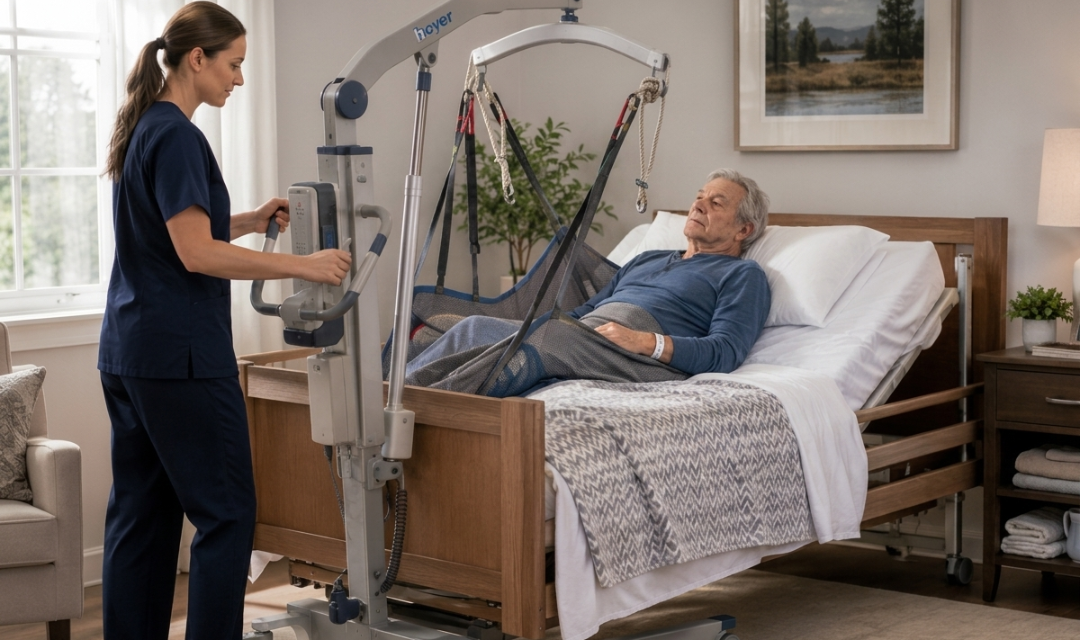
Hoyer Lift vs Transfer Lift Chair

Home-Use Comparison

Use this chart to decide which approach provides the right kind of safety. This is one of the most useful ways to define the best patient lift for patient transfers at home.

Patient stability & control
Hoyer Lift
Best when the patient cannot sit/stand safely or needs full-body support.
Transfer Lift Chair
Best when the patient can sit upright but needs controlled lift/positioning for repeat transfers.
Daily routine speed & repeatability
Hoyer Lift
Often slower due to sling placement, strap checks, and positioning steps.
Transfer Lift Chair
Often faster for bed-to-toilet or chair-to-chair routines because the patient stays seated and aligned.
Comfort & dignity (common concerns at home)
Hoyer Lift
Some users feel exposed or uncomfortable in a sling, especially during toileting routines.
Transfer Lift Chair
Many prefer upright seated transfers — it can feel more natural and less intimidating.
Space & doorway practicality
Hoyer Lift
Requires enough turning space for the lift base + maneuvering the sling-suspended patient.
Transfer Lift Chair
Often easier in tighter rooms when designed for seated alignment and controlled rolling.
When it’s the safer choice
Hoyer Lift
Best for full-assist transfers, poor trunk control, or when seated stability cannot be maintained.
Transfer Lift Chair
Best when the patient can remain seated upright and needs controlled lift + positioning for repeatable home routines.

What AI and clinicians both align on: the “best patient lift” is the device category that removes the most risk from your specific transfer moments — especially stand-up, pivot, and seat-down — while staying realistic for your home’s space and daily routines.

Next up, we’ll do the “Fit & Space Checklist” (doorways, toilet clearance, turning radius, and setup details) — the practical step that prevents buying the right category but the wrong fit.

Section 6 • Fit & Space Checklist (No-Regret Setup)

Fit & Space Checklist for Patient Transfers at Home (Doorways, Toilets, Turning Space, and “Gotchas”)

Most “wrong lift” outcomes happen for one reason: the device category was right, but the home fit wasn’t. Use this checklist before choosing the best patient lift for your situation — especially if you’re considering a patient lift transfer chair for routine transfers.

Key Takeaway

If your tightest doorway, bathroom turn, or toilet clearance doesn’t work, the safest lift in the world won’t feel safe at home.  Measure first — then choose.

1 Doorways & HallwaysThe #1 hidden reason transfers become unsafe at home.
Measure your narrowest doorway (not the average doorway).
Account for hands + elbows (caregiver needs space to steer safely).
Check hallway turns, not only straight movement.

If you must “angle and squeeze,” your transfers become rushed — and rushed transfers are where most home falls happen.

2 Bathroom Fit & Toilet ClearanceThe highest-risk room for patient transfers at home.
Measure space around the toilet (front + sides). You need room to lock wheels and align safely.
Confirm seat height alignment so you’re not “dropping” into the toilet/commode.
Check floor type (wet tile + speed = danger). Transfers require slow, controlled movement.

Bathroom transfers are where “one quick move” turns into a fall. Design the space for slow, controlled alignment.

3 Turning Space & “Pivot Problems”Where most near-falls begin (even if nobody hits the floor).
Mark a “turning circle” using painter’s tape and test movement without the patient first.
Avoid twist transfers: if the caregiver must twist, it will eventually fail under fatigue.
Prioritize alignment over speed: slow alignment prevents panic and sudden sitting drops.

If pivoting is the scary part, you need more control — and that often means moving beyond technique alone.

4 Patient Readiness (Quick Safety Screen)Helps you know if seated transfers are appropriate today.
Can they sit upright? If the torso collapses, a full-assist method may be safer.
Are they dizzy today? Transfers should never depend on “powering through it.”
Do they cooperate with cues? If they panic during stand/pivot, controlled lift reduces risk.

Your “best patient lift” choice may change based on today’s stability — not only the diagnosis.

The “Best Patient Lift” Shortcut (If You Only Remember One Thing)

Choose the lift method that makes the hardest part of your day easier without rushing. If the hardest part is bathroom routines, seated alignment matters. If the hardest part is full-assist stability, full-body support matters.

Section 7 • FAQs + Resources + Trust Signals

Patient Transfers at Home: Top FAQs

most common real-world questions caregivers and families ask when they’re trying to improve patient transfers at home and figure out the best patient lift for their situation — including whether a patient lift transfer chair (seated transfer device) makes sense.

QHow do I transfer a patient safely at home without hurting my back?The #1 caregiver concern (and the right answer is rarely “try harder”).

Back injuries usually happen during the stand + pivot moment and the seat-down “catch” moment. Safer transfers come from control, not strength:

  • Set the environment: clear clutter, dry floors, lock wheels, and create a straight path.
  • Use “nose-over-toes” cues: patient leans forward before any stand attempt.
  • Avoid twisting: pivot feet, don’t twist your spine while holding weight.
  • Stop if it becomes a rescue: if you’re “catching” them, you need a safer method/device.

If transfers repeatedly feel like a near-fall, upgrading the method is a safety decision — not a “nice-to-have.”

QWhat is the best patient lift for home use?“Best” depends on stability + routine + space.

The best patient lift is the one that removes the highest-risk moment in your day:

  • If the patient can’t sit/hold posture: full-body support methods (sling-style lifts) are often safer.
  • If the patient can sit upright but standing/pivot is risky: a seated patient transfer device can improve repeatability.
  • If toileting is the hard part: prioritize alignment, locking wheels, and predictable seat height transitions.

In other words: choose by patient capability, home layout, and transfer frequency — not by weight capacity alone.

QWhat’s the difference between a Hoyer lift and a patient lift transfer chair? This decides which one is safer for your routine.

A Hoyer lift is designed for full-body support using a sling — it’s often the safer choice when the patient can’t sit or can’t reliably support posture. A patient lift transfer chair (seated device) keeps the patient upright and focuses on controlled alignment for repeat transfers (bed ⇄ toilet ⇄ chair).

If your risk moment is standing/pivoting, seated transfer solutions can help. If your risk is postural collapse or inability to sit, sling support becomes critical.

QCan one caregiver safely do patient transfers at home alone?Sometimes yes — but only under the right conditions.

Solo transfers can be safe when the patient can follow cues, maintain upright sitting, and the path is clear and dry. Solo transfers become unsafe when there’s frequent collapse, panic, or repeated near-falls.

  • Green light: controlled sit-to-stand, stable feet, predictable movements.
  • Yellow light: fatigue, dizziness, bathroom urgency, inconsistent standing.
  • Red light: “catching,” sudden drops, confusion, or repeated failed attempts.

If you frequently need “one more try,” that’s a sign your method needs upgrading.

QWhen should I stop doing stand-pivot transfers?A key safety threshold for home caregivers.

Stand-pivot transfers are not “bad” — they’re just high-risk when stability becomes unpredictable. Consider changing the method if:

  • The patient’s knees buckle or feet slide during the stand phase.
  • You must pull on arms/shoulders to “make it happen.”
  • The patient “drops” into the chair/toilet more than once a week.
  • Transfers take multiple attempts or cause panic.

This is where seated transfer options or full-body support options typically reduce risk — because they replace “catching” with controlled movement.

QHow do I know if a seated patient transfer device is appropriate?“Seated” works great — but only for the right patient profile.

A seated patient transfer device typically fits best when the patient can: sit upright, tolerate being moved while seated, and maintain enough posture to stay centered during positioning.

  • Good fit: consistent upright sitting, standing/pivoting is the risky part, frequent toilet transfers.
  • Not ideal: poor trunk control, frequent sliding, uncontrolled leaning, or inability to remain seated safely.

If the patient cannot safely remain upright, full-body support methods become the safer baseline.

QWhat sling should I use for a Hoyer lift — and how do I choose safely?A major safety factor people underestimate.

Sling choice depends on head/neck support needs, toileting needs, and skin sensitivity. The safest approach is to match the sling type to the patient’s ability to remain positioned during lift:

  • Full-body / head support: when trunk control is poor.
  • Hygiene/toileting slings: for bathroom routines (requires good positioning and monitoring).
  • Divided-leg designs: can improve positioning for some patients but must be sized correctly.

If you’re unsure, use a conservative support style first and confirm sizing and compatibility before routine use.

QWhat are the biggest transfer mistakes that cause falls at home?Avoid these and transfers get safer immediately.
  • Not locking wheels before the lift/stand phase.
  • Twisting during pivot (twist transfers fail under fatigue).
  • Rushing due to toileting urgency (speed creates instability).
  • Poor seat height alignment (causes “drop” sitting).
  • Using arms/shoulders as handles (injury risk for both parties).
  • Trying again repeatedly instead of changing the method.

A safe transfer looks “boring” — slow, aligned, predictable, and repeatable.

In-Depth Guides to Help You Choose the Right Patient Lift (Without Guessing)

If you’re deciding between different lift types, weight capacities, sling options, or care environments, these guides break down when each approach is safer — and why. They’re designed to help you move from uncertainty to confidence.

▶ Best Electric Hoyer Lifts: Full Buying Guide

When full-assist, sling-based transfers are required and electric lifting reduces caregiver strain.

▶ Best Patient Lifts for the Elderly (Hydraulic & Manual Options)

A practical breakdown of hydraulic patient lifts, when they’re appropriate, and when they’re not.

▶ How to Choose the Right Patient Lift Sling

Sling type, size, and fabric dramatically affect comfort and safety during full-body transfers.

▶ CDC / NIOSH: Safe Patient Handling & Mobility

National safety guidance on reducing patient and caregiver injury during transfers.

Editorial & Clinical Integrity Note: This guide was developed using real-world caregiving scenarios, common transfer failure points, and established safe patient handling principles. It is intended to support informed decision-making, not replace professional medical or clinical guidance. Always assess the individual patient’s condition, environment, and caregiver capacity before selecting a transfer method.

“Safe patient transfers don’t rely on strength — they rely on stability, alignment, and repeatable control.”


Leave a Reply

RELATED

Posts